A lenient twist on the "item a day" craft challenge

The "item a day" craft challenge has always intrigued me. But it's a huge commitment! Lots of crafters have work, families, and other obligations that may prevent them from crafting every single day. So I decided to see if I could make 7 things a week. Let's see how long I can keep this up.
Showing posts with label leather. Show all posts

Sunday, February 17, 2013

Week 44: Au Naturale

This week I decided to try and work with more "natural" materials; stone, shell, pearls and the like.  In do very much enjoy working with all types of materials but I noticed recently that I had fallen into a "polished gemstones and metal" rut.  So I challenged myself to come out of it, and here are the results:

Freshwater Pearl Earrings
Earrings with shell and freshwater stick pearl dangles.  I've had the shell dangles forever, and I'm so glad I finally got a chance to use them!
Fancy Jasper Arrowhead Pendant
Wire wrapped natural stone and fancy jasper arrowhead.  The base arrowhead was a gift from my aunt, the fancy  jasper one on top was purchased at Fire Mountain.
Driftwood and Copper Pendant
Copper wire wrapped driftwood necklace.  I'm really happy with how this turned out, and can't wait to start using more driftwood in my designs!
Steel Wire Wrapped Stone Pendant
Lake stone wire wrapped in steel on leather, with hand-wrapped steel beads.  Making wire wrapped beads was super fun, and I'm sure I'll be incorporating more of those into my future designs.
Freshwater Pearl and Shell Earrings
Shell and freshwater pearl dangle earrings.  I love the iridescence of the black coin pearls! 
Matte Finish Stone Necklace
Matte-finished stone stick necklace, in rainbow of course!  I'm falling in love with matte finishes on stones; it really does make them feel more raw and natural.
Empty watch face turned into a pendant!  I filled it up with this cool box of old animal teeth I had (don't ask...) and some text from an old book.    Then I added some raw quartz point dangles.  I'm sorry for the picture quality; for some reason this bad boy was really difficult to photograph!
It was really nice to get back to working with elements that had a more natural feel.  All in all I feel like the natural elements give the designs a softer feel, which is nice.  Thanks for checking us out this week, and I'll catch you next time!

Sunday, February 3, 2013

Week 42: Chip Off the Ol' Block

It's no lie, I have a king's ransom in stone chips I've collected over the years.  A small country's king for sure, but a king nonetheless.  I don't really use them so much as I collect them, and I decided that it was time to put the collection to good use and actually make something.  Thus, here are seven stone chip jewelry designs!

Stone chip and leather necklace
Sodalite and quartz crystal necklace on leather.  I'm glad I finally found a use for those giant bead cones!
Stone chip and wire cage pendant
Wire cage (with ammonia and salt patina) filled with raw aquamarine chips.
Russian Amazonite and Amber Earrings
Russian Amazonite and Amber wire wrapped square earrings
Stone Chip on Leather Earings
Tiger eye on turquoise leather teardrop earrings
Garnet, Citrine, Peridot & Amethyst bracelet
Amethyst, peridot, citrine, and garnet chip bracelet.  Hurray for memory wire!
Rainbow Stone Chip Earrings
Chakra chip earrings.  Garnet, carnelian, citrine, moss agate, sodalite, amethyst and quartz crystal.
Two strand amber and rainbow obsidian chip necklace.
 This didn't even begin to put a dent in my stash, but at least it's a start!

Sunday, July 29, 2012

Week 15: Bracelets Abound!

I don't know what kind of can of worms I opened up by flirting with bracelet design, but I'm hooked!  This week is now the first back to back theme week of the year; mostly because I just wanted to make some more bracelets.  And here they are:

This was a fun bracelet I made by raiding my overabundant hook-and-eye stash.  Add jump rings and a clasp and voila!  Instant bracelet.
Leather with beads and a wire spiral
Leather with a small (and functioning!) hinge.
Multi-strand bronze metallic leather bracelet.  There are eight strands of the leather, but you can't quite see them all in the picture.  This one may be my favorite to wear of the new batch.
Leather cuff with eyelet studs and chain for a hand wrap.  Whoo, fancy!
Wire circle with wrapping and  various semiprecious stones.  I lied.  This one is my favorite to wear of the batch!
And here is the final (and most time consuming) bracelet of the week!  Two leather straps connect a strip of Euro 4 in 1 chainmail.
I got the design for the Euro 4 in 1 bracelet from an excellent book by Laura Poplin called "Unconventional Chain Mail Jewelry".  I highly recommend checking out this book if you are in the intermediate stage of chainmail construction and are looking for new directions to take your designs.  Expect to see more projects inspired by the book in the future!

Sunday, July 22, 2012

Week 14: Brace Yourself!

A friend of mine recently pointed out to me that because I don't wear many bracelets I tend not to make many bracelets.  I didn't believe her at first, but when I went back through all my posts I found that to be really true.  I did a little looking around on the interwebs to see what kinds of bracelets seem to be popular right now, and I came across the trend of wearing a lot of chain and leather bracelets stacked all together.  I feel in love.  LOVE.  Inspired by my new muse, I decided to do an entire week devoted to bracelets.

I started off easy with a simple braided wrap bracelet.  This one goes around the wrist three times and connects with a lobster claw clasp.
Braided leather "charm" bracelet
These leather and button closure bracelets seem to be quite "in" right now.  I can see why; they're the only bracelet I've ever made that I haven't had a hard time closing myself.  Yay button magic!
Another kind of button magic bracelet.  I like this one a lot too; it feels quite sturdy.  Also, the fake buffalo nickel  button is pretty fun.
The first of the chain wrapped in leather set.  I really like how the turquoise and gold turned out.  The silver and green was a fun color combo but a little chunky to wear.  These both close with lobster claw clasps.  At least the chain is sturdy enough for me to tug on while I try to get them fastened!
The second version of the chain and leather bracelet.  This one is probably my favorite.  The extra strip running along the sides of the chain adds some structure and some extra color.  Also symmetry = happy me.  these close with toggle clasps, which I'm not super fond of for necklaces but turns out I love 'em for bracelets!  Go figure.
The mac daddy of the chain and leather bracelets I made.  This bad boy combines two chains.  Whoo!  Livin' dangerously!  I like the fall colors, but all in all it's too much bracelet for me.  : )
I really enjoyed the challenge of making something that I would not ordinarily wear.  I know that a lot of things I make aren't my personal style, but I still feel like I have a good sense of balance for earrings and necklaces.  Bracelets was a totally new territory for me though, and it was nice to have to work my brain in order to get some of the styles to work.  I'm also super stupid excited about this new "wrapped chain" thing and can't wait to incorporate it into some necklaces.  Maybe that'll be next week.  Until next time!

Sunday, July 1, 2012

Week 11: Warm Leatherette

To help atone for last week's "gluing stuff to other stuff" crafting theme, I decided to pick up a medium I haven't used much before: Leather.  A couple of years ago I picked up some leather (and pleather!) skirts at Goodwill for practically nothing.  My intent was always to turn them into something, and thanks to this blog I actually got around to it!  Eventually.  I did also grab a bag of leather remnants from Joann's to help supplement my color supply; unsurprisingly the skirts I had gotten were all black except the one pleather snakeskin print skirt.

The other awesome thing about this week is it gave me a great opportunity to put my recently purchased Sizzix Big Kick to work.  One of the touted features that eventually led me to purchase a machine was that the dies could cut through fabric, as well as paper and card stock.  The other feature I was into was the embossing feature.  I managed to use both the cutting and the embossing functions while putting together this week's projects.  Woohoo!  I love gettin' my money's worth.  Anyway, on to the items!

Hair Flower!  I used a die to cut the different flowers.  Then I used fabric stiffener to make it hold its shape, and placed my very first rivet in the center to hold it all together.  I used Tsukineko chalk based inks to add the turquoise color. I ran the brown leather flowers through the embosser, but after the leather was pretty thin so you can't really tell.  Still, it does add a bit more texture to the overall piece so I'm not complaining.  : )
I liked the first hair flower I made so much that I made it some friends!  These were made of thinner leather/pleather, so  I sewed them together and added a bead to the center.  These are all glued to a felt backing, then glued to an alligator clip.  Because industrial strength is the only type of equipment that will stay in my hair!
Butterfly wing earrings.  These were also die cut.  I am really having a butterfly thing lately, and this is the first project I've tried that actually looked the way I wanted it to when finished.  Hurray!
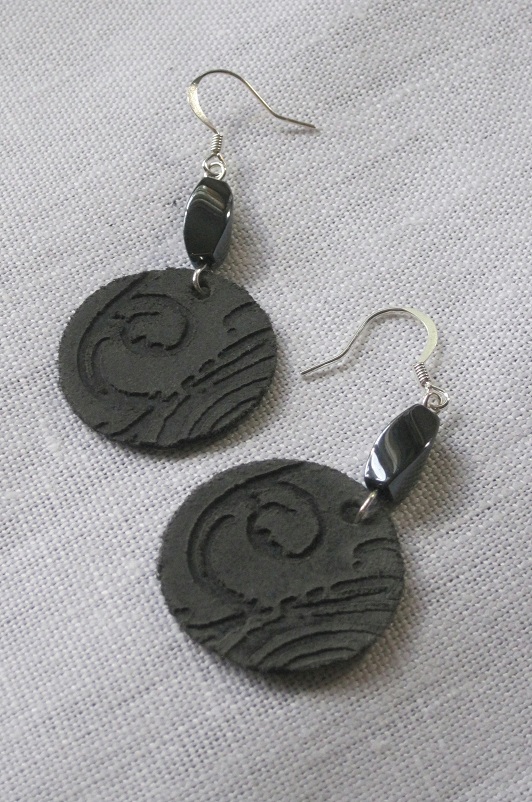
Die cut circles that I ran through the embosser to give them texture.  I really like how these turned out and can't wait to emboss more stuff.  I see a lot of hand made leather components in my future!
Hand cut squares, linked together with super short Japanese 2 in 1 chains.  Punching all the holes in the little squares way more time than I thought it would but I'm pretty happy with the results.
Hand cut leather "feather" earrings.  These took FOR-EV-ER.  First I cut the shapes, then I "fringed" them, then i took super tiny slices out of the fringe cuts to give them a more raggedy look.  Without the extra cuts they looked pretty smooth and not feathery at all.
Steampunk has invaded everything!  These are die cut gears that I arranged and glued together using my trusty sidekick, FabriTac.  I then cut a two piece felt base, glued the gears to the top, glued the ribbon to the "back" of the top, and then glued the final layer on top of the ribbons to sandwich them in so their ends weren't exposed.  I wanted to do it with chain instead of a bib, but it didn't quite look right.  The background grey makes it look like a more cohesive piece.
And my favorite, the leather leaf.  I'm so stupid pleased with this necklace.  Only about 1 in every 20 projects turns out EXACTLY the way I imagined it in my head, and this is definitely one.  I embossed the die cut leaf and then ran it through an embossing folder.  I then used the same Tsukineko chalk inks from the hair flower to highlight the embossed area, and sealed it with an acrylic spray.  It was a little plain on it's own, and I had a hard time figuring out what to put with it to give it some extra flair.  Then I remembered that I had some amazing Labradorite that had "flash" similar to the ink color.  I wire wrapped three of them and threw them on the ring bail.  I think they work really well together!
So, yay leather!  I really and truly enjoyed my foray into this medium.  I've got about half a dozen more ideas in my journal for future leather projects, so expect another leather week sometime in the next 41 weeks.  Again, thanks for looking!