A lenient twist on the "item a day" craft challenge

The "item a day" craft challenge has always intrigued me. But it's a huge commitment! Lots of crafters have work, families, and other obligations that may prevent them from crafting every single day. So I decided to see if I could make 7 things a week. Let's see how long I can keep this up.
Showing posts with label buttons. Show all posts

Sunday, December 2, 2012

Week 32: Ring Week, Round 1

I love rings.  Well, I love wearing them, anyway.  I haven't really tried making rings before, and I realized that this was a pretty big gap in my jewelry making adventures.  So I went hunting and found seven different types of "ring blanks" to embellish.  This is what I came up with:
  
Flower Cocktail Ring
This ring base was one that had a single eye in the middle of the band.  I think it was for attaching beads on headpins to make one of those cool cluster rings.  But while fiddling around I realized that the eyelet fit perfectly into some flower components that I had.  I domed one of my gears to help it fit into the design, and then stacked them all onto the eyelet, securing them with wire and a sparkly copper bead.
Clock Key Ring
This ring is maybe the most basic of the week.  The ring base for this one was a plain brass band with several different holes in it.  I'm really not sure what it's intended use was, but I used the holes to anchor some wire, then wrapped this cool clock key charm I had onto the base.  Simple, but fun!
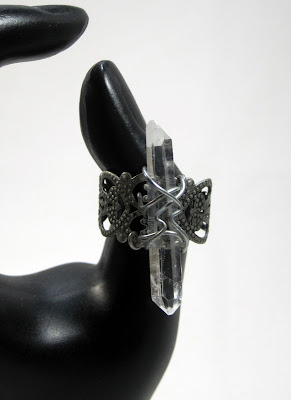
Double Terminated Crystal Point Ring
I love quartz crystal points.  I came across a bounty of them at the Crystal Connection, a local shop for VA rockhounds.  When I found these filigree ring bases, I just knew I needed to wire wrap a crystal point onto one.  I've had some very cool crystal point rings in the past, but they've all gone out of my life now.  I'm crazy excited to have one again!
Candy Ring
I love sprinkles!  And I've wanted to expand my experimentation with resin.  This ring base with a deep bezel seemed to be the perfect opportunity to combine the two.  I used a UV curing resin because it takes so much less time to set than regular resin, but I had issues with teeny tiny little bubbles forming.  By the time they rose to the surface, the resin had already started to set.  I think that UV resin will be great for some projects, but the sprinkles just had too many gaps for air bubbles to hide in.  Still, while not perfect it is perfectly wearable!
Sculptural Industrial Ring
This ring began as some sort of fidgety meddling on my part, and quickly became something extra crazy.  The ring base is a neat domed circle with an eye in the middle for attaching beads.  I happened to have big dish of safety pins sitting on my craft table, and started putting them through the eye just to see what it would look like.  A few quickly became several, which became many, which became many many, which became lots.  (Pratchett fan!)  Once I couldn't fit any more onto the base, I started stacking safety pins on top of each other.  I really love the result;  it's so much more sculptural than anything I've done in awhile.
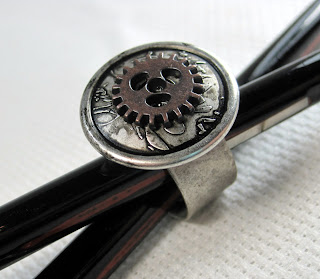
Steampunk Gear Ring
The base for this ring was what most people think of when they think of a standard ring blank, a band with a flat surface for affixing some embellishment.  I've been holding onto these cool etched buttons for a long time, and this seemed like the perfect opportunity to use them.  I had to file the back of the button flat, but that was the most work I did for this project.  Other than that it was just glue, glue, glue.  Still, the final results are pretty darnn cool.
Wire Wrapped Stone Ring
This ring turned out so much better than I thought it would!  The ring base is pretty funky; it's a standard adjustable band but it has this weird filigree flower type bit on the front for affixing things to.  The flower isn't flat, so I'm not sure what exactly it was intended for, as it doesn't seem to be made to hold glue or anything like that.  I decided to use it to wire wrap as it gave me a pretty solid anchor point.  I had this itty bitty snowflake obsidian donut that I wrapped onto the base, then embellished it with some tiger eye beads and a nice round quartz bead. 
All in all, I'm pretty happy with the way that most of the projects turned out, but using pre-made ring bases was limiting.  That's why I've decided that next week I'm going to make seven different rings using my own wire wrapped bases.  I'll see you then!

Sunday, July 22, 2012

Week 14: Brace Yourself!

A friend of mine recently pointed out to me that because I don't wear many bracelets I tend not to make many bracelets.  I didn't believe her at first, but when I went back through all my posts I found that to be really true.  I did a little looking around on the interwebs to see what kinds of bracelets seem to be popular right now, and I came across the trend of wearing a lot of chain and leather bracelets stacked all together.  I feel in love.  LOVE.  Inspired by my new muse, I decided to do an entire week devoted to bracelets.

I started off easy with a simple braided wrap bracelet.  This one goes around the wrist three times and connects with a lobster claw clasp.
Braided leather "charm" bracelet
These leather and button closure bracelets seem to be quite "in" right now.  I can see why; they're the only bracelet I've ever made that I haven't had a hard time closing myself.  Yay button magic!
Another kind of button magic bracelet.  I like this one a lot too; it feels quite sturdy.  Also, the fake buffalo nickel  button is pretty fun.
The first of the chain wrapped in leather set.  I really like how the turquoise and gold turned out.  The silver and green was a fun color combo but a little chunky to wear.  These both close with lobster claw clasps.  At least the chain is sturdy enough for me to tug on while I try to get them fastened!
The second version of the chain and leather bracelet.  This one is probably my favorite.  The extra strip running along the sides of the chain adds some structure and some extra color.  Also symmetry = happy me.  these close with toggle clasps, which I'm not super fond of for necklaces but turns out I love 'em for bracelets!  Go figure.
The mac daddy of the chain and leather bracelets I made.  This bad boy combines two chains.  Whoo!  Livin' dangerously!  I like the fall colors, but all in all it's too much bracelet for me.  : )
I really enjoyed the challenge of making something that I would not ordinarily wear.  I know that a lot of things I make aren't my personal style, but I still feel like I have a good sense of balance for earrings and necklaces.  Bracelets was a totally new territory for me though, and it was nice to have to work my brain in order to get some of the styles to work.  I'm also super stupid excited about this new "wrapped chain" thing and can't wait to incorporate it into some necklaces.  Maybe that'll be next week.  Until next time!